Queues are FIFO (first in-first out) structures.
Operations are add (enqueue) at rear and remove (dequeue) from rear as well as the usual peek, isFull, isEmpty, clear, etc.
Last time discussed linked list implementation
The main problem with this is that deletions and additions to the queue will result in elements removed from the left side and added to the right side. Thus the queue will "walk" off to the right over time, even if it remains the same size (e.g., imagine what happens after 100 adds and 100 removes). While the vector will keep growing to compensate, the Vector will keep growing and each time it grows, it will cost twice as much.
Alternatively we could change the deletions so that the element at the head (0 index) is actually removed. However this would make the remove method O(n).
Suppose we can set an upper bound on the maximum size of the queue.
How can we solve the problem of the queue "walking" off one end of the array?
Instead we try a 'Circular' Array Implementation w/ "references" (subscripts) referring to the head and tail of the list.
We increase the subscripts by one when we add or remove an element from the queue. In particular, add 1 to front when you remove an element and add 1 to rear when you add an element. If nothing else is done, you soon bump up against the end of the array, even if there is lots of space at the beginning (which used to hold elements which have now been removed from the queue).
To avoid this, we become more clever. When you walk off one end of the array, we go back to beginning. Use
index = (index + 1) mod MaxQueue
to
walk forward. This avoids the problem with falling off of the end of the
array.
Exercise: Before reading futher, see if you can figure out the representation of a full queue and empty queue and how you can tell them apart.
Notice that the representation of a full queue and an empty queue can have identical values for front and rear.
The only way we can keep track of whether it is full or empty is to keep track of the number of elements in the queue. (But notice we now don't have to keep track of the rear of the queue, since it is count-1 after front.)
There is an alternative way of keeping track of the front and rear which allow you to determine whether it is full or empty without keeping track of the number of elements in the queue. Always keep the rear pointer pointing to the slot where the next element added will be put. Thus an empty queue will have front = rear. We will say that a queue is full if front = rear + 1 (mod queue_length). When this is true, there will still be one empty slot in the queue, but we will sacrifice this empty slot in order to be able to determine whether the queue is empty or full.
public class QueueArray implements Queue
{
    protected Object data[];    // array of the data
    protected int head;         // next dequeue-able value
    protected int count;        // # elts in queue

    public QueueArray(int size)
    // post: create a queue capable of holding at most size
    //          values.
    {
        data = new Object[size];
        head = 0;
        count = 0;
    }

    public void enqueue(Object value)
    // post: the value is added to the tail of the structure
    {
        Assert.pre(!isFull(),"Queue is not full.");
        int tail = (head + count) % data.length;
        data[tail] = value;
        count++;
    }

    public Object dequeue()
    // pre: the queue is not empty
    // post: the element at the head of the queue is removed
    //          and returned
    {
        Assert.pre(!isEmpty(),"The queue is not empty.");
        Object value = data[head];
        head = (head + 1) % data.length;
        count--;
        return value;
    }

    public Object peek()
    // pre: the queue is not empty
    // post: the element at the head of the queue is returned
    {
        Assert.pre(!isEmpty(),"The queue is not empty.");
        return data[head];
    }

    ...

    public int size()
    // post: returns the number of elements in the queue.
    {
        return count;
    }

    public void clear()
    // post: removes all elements from the queue.
    {
        // we could remove all the elements from the queue.
        count = 0;
        head = 0;
    }

    public boolean isFull()
    // post: returns true if the queue is at the capacity.
    {
        return count == data.length;
    }

    public boolean isEmpty()
    // post: returns true iff the queue is empty
    {
        return count == 0;
    }
}
The complexity of operations for the array implementation of the queue is the same as for the linked list implementation.
There are the same trade-offs between the two implementations in terms of space and time as with stacks above. Notice that we do not bother to set array entry for dequeued element to null. Similarly with clear. Thus the garbage collector would not be able to sweep up removed elements even if not in use elsewhere. It would probably make sense to be more consistent with Vector and clean up behind ourselves.
Recall the following code from the web page associated with the last lab. It is the beginning of the class ButtonDemo:
public class ButtonDemo extends Frame
{
    protected Button startButton, stopButton;
    public ButtonDemo()
    {
        super("Button demo");   // calls Frame constructor
                                            // which adds title to window
        setSize(400,200);           // sets the size of the window

        // sets layout so objects added go from left to right
        // until fill up row and then go to next row
        setLayout(new FlowLayout());

        // create two new buttons w/labels start and stop
        startButton = new Button("Start");
        stopButton = new Button("Stop");

        // set backgrounds of buttons
        startButton.setBackground(Color.green);
        stopButton.setBackground(Color.red);

        add(startButton);   // add buttons to frame
        add(stopButton);

        // create an object to listen to both buttons:
        ButtonListener myButtonListener = new ButtonListener();

        // tell buttons that myButtonListener should be notified
        startButton.addActionListener(myButtonListener);
        stopButton.addActionListener(myButtonListener);
    }
...
}
Thus
ButtonDemo is an extension of Frame (i.e., it represents a window) which has
two buttons, startButton and stopButton.The two method calls:
        add(startButton);   // add buttons to frame
        add(stopButton);
add the two buttons to the frame according to the rules for FlowLayouts, which
essentially just add items from left to right until it runs out of space and
then starts a new row of items.
As we have seen, a Frame can also be assigned this layout manager by executing:
setLayout(new FlowLayout());
BorderLayout has two constructors:
public BorderLayout()
public BorderLayout(int horizGap, int vertGap)
// leaves given gaps between components.
The layout manager of an applet or panel can be changed to BorderLayout by executing:
setLayout(new BorderLayout())
Components are added by using a more refined version of add:
add(String direction, Component comp)
Thus to add a button on the north, write
add("North",startButton)
Note that all directions must begin with a capital letter or an error will occur.
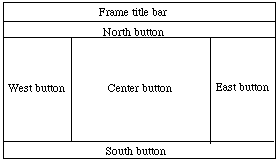
Components added to "North" and "South" extend to the left and right edges of the Applet, while those added "East" and "West" extend up and down to the components to the "North" and "South". The component in the "Center" fills the remaining space.

If one component is omitted, other components stretch to fill that space.
With the BorderLayout, components stretch to fill all of the container. As a result using this by itself can often make layouts look distorted.
public GridLayout(int rows, int cols)
// Construct layout w/ given
rows and columns
public GridLayout(int rows, int cols, int h, int v)
// Construct
layout w/ given rows and columns, and
// horiz and vertical gaps of h and
v between components
Executing
setLayout(new GridLayout(2,3))
divides the applet into 2 rows and 3 columns. When "add" method is executed, components are added from left to right first across the first row, then second row, etc.
The only somewhat unfortunate thing about GridLayout is that all components added are resized to be exactly the same size.
The constructor for a panel is:
public Panel()
Its constructor is:
public Canvas()
Both Panel and Canvas have method:
public void resize(int width, int height)
Canvases must be resized or they will be set to have size (0,0). You can try to resize panels, but the layout manager may stretch them to a somewhat different size.

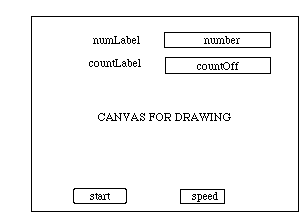
public Josephus extends Frame{
    ...
            // fields for number of people
    protected Label numLabel = new Label("  Number of people (<= 26)");
    protected TextField number = new TextField("26");

            // fields for # soldiers to skip btn elimination
    protected Label countLabel = new Label("  Number to skip");
    protected TextField countOff = new TextField("7");
    protected int numSkip;

            // Button to start finding messenger
    protected Button start = new Button("Start");
            // Choice button to set speed
    protected Choice speed = new Choice();

    // Panels and canvases for Applet
        // holds data entry fields
    Panel input = new Panel();
        // for displaying animation of selection process
    Canvas diagram = new Canvas();
        // holds start button and speed selector
    Panel startPanel = new Panel();

// constructor
    public Josephus() {
                // sets gap of 5 pixels between components
        setLayout(new BorderLayout(5,5));

                // Set up input fields in two rows and two cols
                // using GridLayout (and leave gap of 5 pixels)
        input.setLayout(new GridLayout(2,2,5,5));
                // Add label and number field to input
        input.add(numLabel);
        number.setBackground(Color.white);
        input.add(number);

                // Add label and field for number to skip
        input.add(countLabel);
        countOff.setBackground(Color.white);
        input.add(countOff);

                // Add input to top of frame
        add("North",input);

                // Set up canvas and add to center of frame
        diagram.setSize(200,400);
        add("Center",diagram);

                // Set up panel with start button and speed control
                // Since no explicit layout manager uses FlowLayout
        start.setBackground(Color.cyan);
        startPanel.add(start);
        start.addActionListener(this);
                // Set up speed choice button
        speed.addItem("Slow");
        speed.addItem("Medium");
        speed.addItem("Fast");
        speed.addItemListener(this);
        startPanel.add(speed);
                // Add startPanel at bottom of frame
        add("South",startPanel);
    }
See
the calculator program for another relatively complex example of laying out
buttons and a label.