Recall the action routine has declaration:
public boolean action (Event evt, Object obj)
See example Book (but ignore layout).
BorderLayout has two constructors:
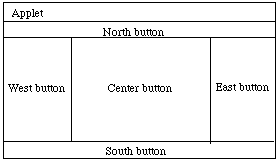
	public BorderLayout()
	public BorderLayout(int horizGap, int vertGap)
					// leaves given gap size between components.
The layout manager of an applet can be changed to BorderLayout by executing:
setLayout(new BorderLayout())Components can be added by using a more refined version of add:
add(String direction, Component comp)Thus to add a button on the north, write
add("North",startButton)
Note that all directions must begin with a capital letter or an error
will occur.Components added to "North" and "South" extend to the left and right edges of the Applet, while those added "East" and "West" extend up and down to the components to the "North" and "South". The component in the "Center" fills the remaining space.
If one component is omitted, other components stretch to fill that space.
With the BorderLayout, components stretch to fill all of the Applet. As a result using this by itself can often make layouts look distorted.
	public GridLayout(int rows, int cols)
	   // Construct layout w/ given rows and columns
	public GridLayout(int rows, int cols, int h, int v)
	   // Construct layout w/ given rows and columns, and
	   // horiz and vertical gaps of h and v between components
Executing
setLayout(new GridLayout(2,3))divides the applet into 2 rows and 3 columns. When "add" method is executed, components are added from left to right first across the first row, then second row, etc.
The only somewhat unfortunate thing about GridLayout is that all components added are resized to be exactly the same size.
The constructor for a panel is:
public Panel()
Its constructor is:
public Canvas()Both Panel and Canvas have method:
public void resize(int width, int height)Canvases must be resized or they will be set to have size (0,0). You can try to resize panels, but the layout manager may stretch them to a somewhat different size.
The example program Book provides a good example of using panels and both FlowLayout and BorderLayout to lay out an applet nicely.
We'll see other examples later.
Back up for moment to talk about event handling. All events go to a default method handleEvent(Event evt)
This default method automatically calls the method action if the event concerns a GUI component.
Other events are routed to other methods (makes it easier to override one without touching others).
No matter how handled, the methods return true to indicate that they were successfully handled, and false otherwise.
Some other events and methods which handle them:
This routine is called when the mouse button is pressed. (x,y) is location of mouse when the button is pressed.
Since Java is usable on systems w/ 2 and 3-button mouses, can pick up click of middle and right mouse buttons by testing for modifier keys (like the way the Mac simulates a 3-button mouse in Exodus).
This routine is called when the mouse button is released. (x,y) is location of mouse when the button is released. Good user-interface programming generally mandates recognizing a mouse click with mouseUp rather than mouseDown.
This routine is called when the mouse is moved and no button is down. (x,y) is location of mouse when the mouse is moved. This event is usually ignored.
This routine is called when the mouse is moved with a button depressed. (x,y) is location of mouse when the button is pressed. This routine is sometimes used in drawing programs to "drag out" graphical objects.
Called when a key is pressed. The parameter key is the unicode value of the key pressed, it can be coerced to a char by writing (char) key. You can check for modifiers (shift key, control key, etc.) when you handle the event.
Called when a key is released. The parameter key is the unicode value of the key pressed. This event is usually ignored.
Constants can be accessed by prefixing the class name, e.g., Event.UP.
Warning: Events can only be handled in Java when nothing else in the applet is being executed. In particular, a mouse click on a "stop" button won't be recognized if other routines are being executed. To do this kind of programming, you need to learn how to spawn "threads" to perform actions while applet is waiting for events to handle.
See "Pusher" for sample code using mouse and key events.