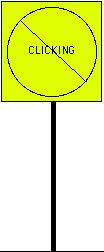
This lab will introduce you to the tools with which you will be working this semester. Your task is fairly simple. You will construct a Java program that draws an image resembling a roadside warning sign, but with a message more appropriate for a computer screen, as shown below.
First you will need to determine the Java commands required to draw such a picture. Then you will write a Java program that draws and modifies the picture in simple ways in response to actions the user performs with the mouse.
To help you learn the primitives for creating graphical objects from within a program before dealing with the details of writing a program, we have constructed an environment in which you can experiment interactively with the graphics primitives. This environment is a program that lets you create and modify objects by clicking buttons and filling in fields that describe the locations and dimensions of the objects. If you think of this program as a drawing program (like Adobe Illustrator) you will quickly conclude it is the worst drawing program in the world. Its interface is designed specifically to use mechanisms similar to those you will use from within your programs, and certainly not for usability as a drawing program. Hence its name: NotPhotoshop.
This part of the lab involves two steps: (i) completing a tutorial on NotPhotoshop and (ii) using it to draw your own rendition of our "no clicking" sign.
To start, you must log in to one of the iMac computers in our lab.
Begin by entering the user name and password that you were provided for your computer science account in the login window and click "Log in". Once you log in, the screen should display a window containing icons for some of the files you can access on the machine.
While the computer is booting, you may see a window pop up asking you to log in to iCloud. Please just ignore this. You can click in the red dot in the upper left corner of the window to make it go away. Hopefully you will never see this again.
Before proceeding, you should change the password we assigned to your account to something that only you will know and that will be easier for you to remember. Don't, of course, make your new password too easy to guess. In particular, at least use something that is a mix of letters and numbers.
To change your password you should:
 at
the bottom of your screen. That will bring up the Safari web
browser.
at
the bottom of your screen. That will bring up the Safari web
browser.
Now, log out and log in again with your new password. To log out select the last item, "Log Out" in the menu with the apple icon near the upper left corner of your screen. Click OK when it asks if you are sure.
The files you create for our course laboratory projects will not actually be stored in the computer on which you are working. Instead, they will be stored on our department's file server. By entering the account information for your account, you have instructed the computer you are using to access your files on that server. You can access your files from any computer in our lab by simply logging in to that computer.
Next observe that there is already a folder labeled "CS51Workspace" on the desktop for your cs51 work. This is where you will do all of your work for this class.
To work on the lab, you will need to move some files from the course folder (named "cs051", with a small red arrow in the upper corner) to your CS51Workspace folder.
Go to your CS51Workspace folder and double click on "Lab1-NotPhotoshop." There will be two items in the folder: a folder, "NoClicking" that you will use later, and a file, "NotPhotoshop.jar". To run NotPhotoshop, double-click on NotPhotoshop.jar. Our drawing program will eventually display a large window on your screen that should look like this:
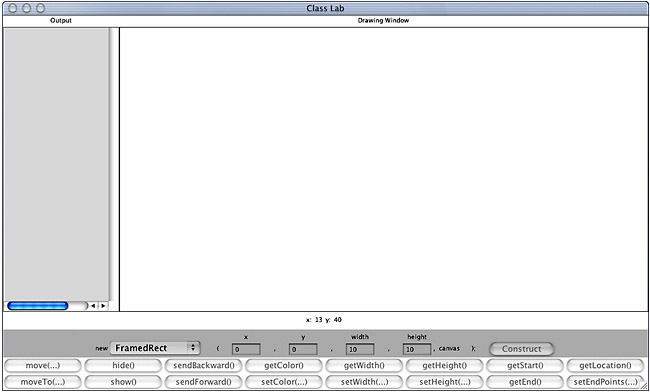
The components in this window are divided into five main units.
To see how all these components work, let's add an object to the display.
You can begin by specifying the object type. The type of object to be created is controlled by the pop-up menu located just to the right of the word "new" in the constructor area. By default, the program starts with the "FramedRect" item selected in the menu. If you depress the mouse on the box labeled "FramedRect", a list of the other choices will appear. Six options are available:
Using the mouse, select "Line" instead of "FramedRect". As you do this, notice that the labels on the text entry boxes to the right of the menu change to reflect the kinds of information you need to enter to specify the appearance of a line rather than a rectangle. For a framed rectangle you need to enter the coordinates of its upper left corner and its width and height. For a line you need to enter the coordinates of two points -- its end points. Use the menu to select other options to see what information they require. To display a piece of text you enter the text to be displayed (although the box for entering the text is rather small) and the coordinates of the upper left corner of the rectangle in which the text should be placed. Ovals require the same input as rectangles; the values that you enter for an oval define rectangular bounds within which the oval is drawn.
To continue, make sure that "FramedRect" is the selected menu item. Fill in the boxes to the right of the menu with values to create a 100x100 rectangle at a location 70 pixels from the top of the drawing area and roughly centered between the left and right boundaries of the drawing area. To determine the actual x value to enter for this rectangle, position the mouse cursor where you estimate the left edge of the rectangle should be and use the "mouse meter" to determine the x coordinate of that point. Enter this value in the box labeled "x" immediately to the right of the menu. Then enter 70 as the "y" coordinate and 100 for both the width and height.
Once all these values have been entered, press the "Construct" button and the rectangle will appear.
When your rectangle appears, it is "decorated" with small black boxes on the edges and corner, indicating that it is the "selected" graphical object. By default, the most recently constructed object will be selected. When multiple objects are displayed, you can change the selected object by clicking within the object you wish to select.
The buttons below the object construction controls can be used to modify the currently selected object. For example, if your rectangle isn't positioned quite where you wanted it, you can move it around using the "move" and "moveTo" buttons. To try this out:
If you enter any invalid information, a brief message will be displayed in the output area, and the dialog box will remain on the screen so that you can correct the error. Common errors include entering non-numeric characters in numeric fields or leaving fields blank.
As with object construction, the text shown in the "move" dialog box is designed to resemble the text you would include in a program if you wanted to instruct the computer to move an object.
If you press "moveTo", you will be asked to specify new coordinates for the origin of the selected object. In the case of a rectangle, the rectangle will be moved so that its upper left corner is placed at the specified point. The "setWidth" and "setHeight" buttons invoke methods that let you change the dimensions of an object. They display a dialog box in which you must enter the new value to be used for the dimension being changed. Of course, it is not possible to set the width or height of a Line. If you try to use setWidth or setHeight while a Line is the selected object, the program will simply display a complaint in the output area.
There is one other button that allows you to change the appearance of an object after it is created. If you find your black rectangle boring, you can easily change its color by pressing the "setColor" button. To do this:
The dialog that appears when you use the setColor button does not attempt to present a display that mimics what you would use to change the color of an object from within a program. The conversion, however, is simple. The items within the dialog box are each a color name preceded by the word "Color". If "selected" is the name of an object whose color you want to change to yellow, then within your program you would just type
selected.setColor(Color.YELLOW);
Later in the semester, we will explain how to select colors other than the small set with which names are associated.
After you have moved an object up and down a few times to get it right where you want it, you may not actually know where it is. That is, you may not know the exact coordinates of its upper left hand corner or remember its dimensions. Luckily the computer knows and will tell you if you press the correct buttons. The "getLocation" button near the right end of the top row of buttons will display the x and y coordinates of the upper left corner of any object (except a Line). Try it. The coordinates will be displayed in the output area. Similarly, the "getHeight" and "getWidth" buttons can be used to determine the dimensions of such objects.
To determine the endpoints of a Line, you can use the "getEnd" and "getStart" buttons. You can set the endpoints of a Line using the "setEndPoints" button. Finally, you can determine the color of any object by clicking on the "getColor" button.
As with the other buttons, these buttons correspond directly to operations you can perform within a Java program. Within a few days, we will discuss how information returned by these methods can be used within a program.
The remaining method invocation buttons are relevant primarily when you are working with a drawing composed of multiple overlapping objects. To demonstrate, let's create another object.
Create an oval and position it so that it overlaps with your rectangle.
If you entered all the coordinates and dimensions properly, then the image in your drawing area should look something like this:

The new oval is now the selected object. Its bounding rectangle is decorated with eight small black boxes.
You can now use the mouse to change the selected object.
In addition to being selected, a new object (like the oval) is located logically "above" previously created objects (like the rectangle). Notice that where the rectangle's left edge overlaps the oval, all you see is the black interior of the oval, obscuring that part of the rectangle. Since the oval is logically above the rectangle, it hides that part of the edge of the rectangle.
There are buttons in the program's controls corresponding to two methods you can use within a program to alter the logical stacking of graphical objects. They are labeled sendBackward and sendForward. To see how they change the stacking:
When multiple objects overlap, you may need to use the "send" buttons to change the selected object. If you can't click on the object you would like to select because it is obscured by another object, first select the other object and use "sendBackward" to move it beneath the object you wish to select. Then click to select the object you desire.
You can think of each object as being drawn on a separate, large sheet of transparent plastic and the image you see is produced by stacking all these sheets of plastic. Changing the stacking is like pulling out the selected sheet of plastic and moving it up or down the stack. This stacking happens even if the objects do not overlap on the screen. Try this:
There are two ways to make an object no longer appear in the canvas: hiding the object and removing the object from the canvas. Hiding the object makes it invisible, but a subsequent "show" operation will make it visible once more. Removing the object permanently removes it from the canvas. We discuss only hiding in today's lab. While both of these options will be available to you when you write programs, only hide and show can be accessed using NotPhotoshop.
So, let's see what happens if we hide the oval. To do this:
You are now ready to construct a rendition of the no-clicking sign shown at the beginning of this document. The interior of the sign should be colored yellow like a good warning sign. To produce such a sign you will use a "FilledRect" for the sign's background and a "FramedRect" for the edge. If you run into problems, ask your instructor or a teaching assistant for help.
When you are done, DO NOT QUIT THE DRAWING PROGRAM! You will need the picture you have created for the next task.
Now, you will construct a Java program to draw the warning sign you have constructed. You will do this using a program named Eclipse which provides everything you need to type in and run Java programs.
The construction of a single Java program involves the use of several files. One file will contain Java code, the actual text of your program. Another file is required to tell the Java system run time details like the size of the window your program should be given. In addition, access to many of the facilities of Java and our graphics system are provided through other files, including "objectdraw.jar".
First, you must start Eclipse by double clicking on the Eclipse icon
 at the bottom of the screen.
The first time that you run Eclipse, it may ask you what folder you want
to use as the "workspace" where it stores files it needs. If it asks, tell
it to use the folder "CS51Workspace" on your desktop.
at the bottom of the screen.
The first time that you run Eclipse, it may ask you what folder you want
to use as the "workspace" where it stores files it needs. If it asks, tell
it to use the folder "CS51Workspace" on your desktop.
During the first run of eclipse, it will also likely ask you if you would like to run "Scala Setup Diagnostics". That has nothing to do with you, but the easiest thing is to just click on "yes" and then "ok" when it asks you to confirm.
For the very first lab, you are going to need to do some configuration of Eclipse to make it work better for the rest of the term. Here is what you need to do:
Once this is done, click OK a few times until you are back on the preferences window.
In the Eclipse window, pull down the "File" menu and select "Import..." from near the bottom of the menu. Select "Existing Project into Workspace" and click the "Next" button. [You may have to click on the triangle next to "General" to see the "Existing Project ..." entry.] Now, click the "Browse" button to the right of the "Select root directory" entry, and navigate to your CS51Workspace folder. (Hint: double-click on "Desktop" if you seem lost.). Double click on CS51Workspace and then on "Lab1-NotPhotoshop". Select (but don't double click) the "NoClicking" folder and then push "OK." Click on "NoClicking" under projects and then push the "Finish" button.
The eclipse workspace window may be obscured by a welcome screen. If so, click on the "x" to remove it.
On the left side of the Eclipse window, in an area called the "Package Explorer" you should now see an entry for "NoClicking". Click once on the triangle to the left of "NoClicking" and then once on the triangle to the left of "(default package)". Then double-click on "NoClicking.java". At this point your Eclipse window should look similar to the image shown below.
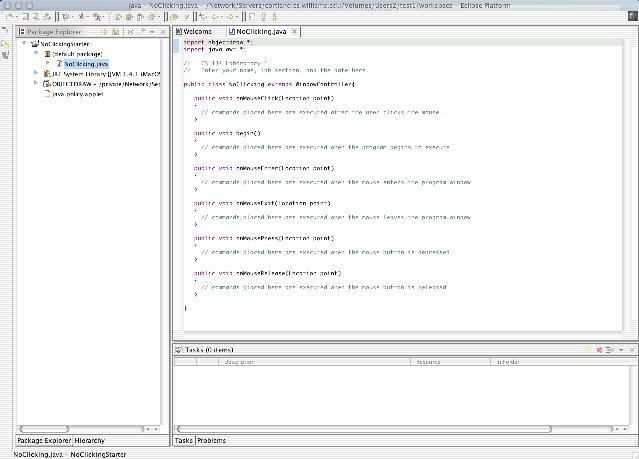
This window has three main regions. On the left, it displays the names of files and their contents in an outline form. The item of interest here is the file in which you will place your Java code, "NoClicking.java". You will not need to change the other items listed.
The large area on the top right side of the screen displays the contents of "NoClicking.java" file. The text of the program as it should initially appear is shown below
import objectdraw.*;
import java.awt.*;

//   CS 51 Laboratory 1 --- practice program
//   Enter your name, lab section and the date here.

public class NoClicking extends WindowController{

    public void onMouseClick(Location point)
    {
      // commands placed here are executed after the user clicks the mouse
    }

    public void begin()
    {
      // commands placed here are executed when the program begins to execute
    }

    public void onMouseEnter(Location point)
    {
      // commands placed here are executed when the mouse enters the program window
    }

    public void onMouseExit(Location point)
    {
      // commands placed here are executed when the mouse leaves the program window
    }

    public void onMousePress(Location point)
    {
      // commands placed here are executed when the mouse button is depressed
    }

    public void onMouseRelease(Location point)
    {
      // commands placed here are executed when the mouse button is released
    }

}
The text we have placed in "NoClicking.java" is the skeleton of a complete Java program. It includes the header for the definition of a class NoClicking that extends WindowController and within the class, headers for the event handling methods you will use. We have not, however, included any Java commands within the bodies of these methods, only a Java comment that reminds you when the Java system will follow any instructions you might add to the method body.
You should follow our lead and begin writing your program by typing comments rather than actual Java commands. Near the top of the file we have included a temporary comment telling you to enter your name, lab section and the current date. Such identifying comments are always good practice, and in a class like this they make the grader's job much easier. Eclipse provides the familiar capabilities of a typical word processor or text editor. You can position the cursor using the mouse or arrow keys. You can enter text and/or cut and paste text using items in the edit menu. Use these features to replace our comment with your name, etc.
Next, you will add Java instructions to the body of the onMouseClick method that will draw a "no clicking" warning sign. This is the first method skeleton we have included in "NoClicking.java".
As a first step, let's add the single instruction needed to draw the rectangle that frames the contents of the sign. The form of the command you will need to enter is:
new FramedRect( ..., ..., ..., ..., canvas);
where all the ...'s need to be replaced by the numbers describing the position and size of the rectangle. This line should be placed immediately after the comment line in onMouseClick (i.e., just before the line containing the "}" that ends the method body).
If you remember all the values that should replace our dots, just type them in where we have shown the dots. Otherwise, you can return to the NotPhotoshop program you used in the first part of the lab to determine the values:
Use Eclipse to add a new FramedRect command to your program with the appropriate values.
As you type this code, you will discover that Eclipse tries to
understand what you are typing as you type it. After typing,
FramedRect, it will have a squiggly line under it. When you type the
"(", Eclipse will automatically provide the ")" and the squiggly
line will go away. If you make a mistake entering the parameters for
FramedRect, the entire line will be underlined and an icon will appear
in the left margin indicating there is an error on that line. If you
move the mouse over this icon and leave it there for a second, a
message will pop-up describing the error. If the icon
is
 , you can then click on the icon and another
message will appear that offers choices on how to fix the error. If
one of these looks like a change you would like to make, you can
double click on it and Eclipse will make the change for you. (If the
icon is
, you can then click on the icon and another
message will appear that offers choices on how to fix the error. If
one of these looks like a change you would like to make, you can
double click on it and Eclipse will make the change for you. (If the
icon is
 , there are no automatic corrections
available, but it will still show you a message describing the
problem.) Understanding these messages will get easier as the
semester progresses.
, there are no automatic corrections
available, but it will still show you a message describing the
problem.) Understanding these messages will get easier as the
semester progresses.
Take your time when Eclipse reports errors. First, errors often occur simply because you are in the middle of doing something and these errors go away when you complete the task. So, it is generally a good idea to ignore the warnings that come up while you are editing. Second, read the messages carefully. They often have good advice. (But not always! Computers are not actually very smart!) Third, before selecting a change to be applied automatically, make sure you understand Eclipse's suggestion. If you don't understand it, it's probably not the right thing to do! Ask an instructor or lab assistant for help.
Your rectangle constructor should now be below the comment in the onMouseClick method. Now that it does something, it would be a good idea to update the comment in the onMouseClick method to say what it does so far. Replace our comment with something more appropriate, like "draws a rectangle when the mouse is clicked". You should get in the habit of updating comments to keep them as accurate as possible as you add instructions to your programs. Not only does this mean you will not have to go back and add comments when you're done, it will help you to remember what everything does as you are writing your programs.
By the way, I prefer to see comments in the line above the method header. I put them in the body here just so it would be clearer that the code goes between the "" and "" after the method header. Please move the comments to the line before each method.
Cutting and pasting on the Mac is similar to that with Windows except you use the "fan" key, to the left of the spacebar, in combination with "x" (for cut), "c" (for copy), and "v" (for paste). You can just erase text by selecting it and then hitting the backspace key.
Before running your program, make sure Eclipse has not found any errors. Save your program by selecting "Save" from the "File" menu. Eclipse now performs even more checks than it does as you are typing. If it finds any problems, it will display them in the "Problems" area at the bottom right of the screen (you may have to click on the tab) and also put an icon in the left margin on lines that have errors. If the problem list is not empty, fix the problems that Eclipse has found. There is a funny bug in Eclipse on the Mac where you occasionally get a rather incomprehensible error message on the console that talks about a bootstrap error. Please ignore it as it will have no impact on your program.
Once all the problems are fixed, you can run your program. Before running the program the first time, you must create a configuration to run as follows:
Note that you only need to create a configuration the first time. Thereafter, you can run your program by clicking on the icon of a white triangle in a green circle that appears in the icon list at the top of the Eclipse window.
When your program runs, a new window titled Applet Viewer: NoClicking.class will appear on your screen. This is your program's window. It should appear blank at first. Move the mouse into the window and click, and a rectangle should appear because Java invokes your onMouseClick method, which includes the instruction to construct a rectangle. If this happens, smile. If not, select "Quit" from the "Applet" menu to leave your program. This will bring you back to Eclipse. Examine the instructions you typed carefully to see if you can find any mistakes. If so, correct them and select "Run" again. Otherwise, ask your instructor or a lab assistant for help.
When you ask Eclipse to "Run" your program, it starts up a new applet program that is separate from the Eclipse application. While this program is running, you can return to Eclipse by just clicking on any portion of the Eclipse window that is visible on your screen. However, to avoid confusion, it is a good idea to "Quit" the old copy of your program that Eclipse created before asking Eclipse to "Run" your program again and create a new copy.
Once your rectangle program is working, you should add more instructions to it to turn it into a complete warning sign drawing program. Back in Eclipse, immediately beneath the line you added to draw the rectangle, add additional lines to create new Text(...), a new FramedOval(...) and all the other components you created using our NotPhotoshop program. In the NotPhotoshop version of the drawing, we told you to have a yellow background for the sign. Leave that part out of the version your program draws for now; we will add it later. Again, you may want to refer back to NotPhotoshop's "getLocation" and related method buttons to help you figure out the coordinates and dimensions to use for each object. As you work, it is a good idea to "Run" your program every time you add a line or two to ensure that you catch mistakes early. Also, make sure your comment line gets updated by the time you are finished. When you are done, your program should draw a sign when you click in the window, and then do nothing until you tell it to quit. In reality, the program draws another copy of the sign each time you click, but you can't tell, as each new sign is drawn exactly on top of the previous one.
Now, to explore event handling methods a bit more, revise your program so that it reacts to the mouse in more interesting ways. In the revised version, the sign will be drawn as soon as the program begins to run. The sign will change, however, as the program runs. In particular, when the user moves the mouse into the program window or presses the mouse, your revised code will alter the appearance of the sign.
Making the program draw the sign when it first starts is easy. You initially placed the code to draw the sign in the onMouseClick method. There is a skeleton for a method named begin immediately after the onMouseClick method definition in the "NoClicking.java" file. As you might guess, the instructions in begin are followed when your program first begins to run. Use cut and paste to move all the drawing instructions from the onMouseClick method into the begin method. Don't forget to update your comments. Run your program again. It should now display the sign even if you don't click the mouse.
Notice that it makes more sense logically to have the begin method occur before the onMouseClick method. We arranged them in the opposite order so that you would be able to find onMouseClick more easily. The point is that the computer does not care which order you write them in your program. Only the names are important (though we urge you to put them in a logical order so that it will be easier for all of us to read!). The order of instructions within a method are important, but the order in which you define the methods within the program is not.
Making the sign change in response to the mouse is a bit trickier. Suppose, for example, that you want to emphasize the sign's warning by changing the color of the word "CLICKING" from black to red when the user moves the mouse into the program's window. As you saw in NotPhotoshop, there is a setColor operation that you can use to change the color of the text. There is also an obvious place to tell Java to make this change. The onMouseEnter method is executed whenever the mouse moves into your program window. Placing an appropriate setColor in that method would do the trick.
The problem is that you can't simply say setColor in the onMouseEnter method. If that was all you said, Java would have no way of knowing which of the several objects' color to change. It could change the rectangle, the oval, the text, all of them, etc. Your code has to be more specific and identify the object that should change.
To be able to specify the text object as the object whose color we wish to set, we will have to give it a name. We will use the name message, but we could use any name that seems appropriate.
Associating a name with an object requires two steps. First, we have to include a line that declares or "introduces" the name. This line informs Java that we plan to use a particular name within the program. At this point, we don't need to tell Java which object it should be associated with, but we do need to specify which sort of object it will eventually be associated with. We plan to associate the name message with an object created as new Text, so we have to tell Java that the name will be associated with a Text object. The form of a Java declaration is simply the name being declared preceded by the keyword private and by the type of object with which it will be associated. So, the form for our declaration is:
private Text message;
You should add a line containing this declaration to your program immediately before the heading of the onMouseClick method.
Now you have to tell Java which object to associate with the name message. Your program currently contains a construction of the form:
new Text("CLICKING", ..., canvas);
that creates the text on the screen. To associate the name message with the text object this line creates, revise this line so that it looks like:
message = new Text("CLICKING", ..., canvas);
This is an example of a construct called an assignment statement. It tells Java that in addition to creating the new object, it should associate a name with it. Shortly, you will convert some of your other constructors into assignments.
Now that the text has a name, we can use the name to change its color. Within the body of the onMouseEnter method add the line:
message.setColor(Color.RED);
Then, run your program (correcting any errors as needed).
Another helpful feature is to let you know what types of parameters a method takes. To see this feature, type "setColor" but leave the parameter list empty. Position the cursor between the parentheses and type control-space (hold the control key down while hitting the space bar). A window will popup showing the types of parameters the method expects, in this case a Color.
The program isn't quite complete. It draws the sign immediately and makes the text turn red when the mouse enters the window, but it doesn't make the text black again when the mouse is moved back out of the window. You should be able to figure out what to add to make it black when the mouse exits. Give it a try.
To get more practice using names and other event handling methods, we would like you to modify your program a bit more. First, change the program so that while the user is depressing the mouse button, the circle with the diagonal line through the text disappears. (Of course, it should reappear when the mouse is released.) This will require that you declare names for the circle and the line and associate them with the correct objects. These declarations should appear right after the declaration of message. Your code to make the objects disappear and reappear goes in the onMousePress and onMouseRelease methods. You can use the hide and show methods to handle the disappearing and reappearing.
Finally, add the yellow background to the sign. We didn't have you do this earlier because you had not yet seen how to associate names with objects. Associate a name with the background rectangle when you create it and then use the name to set its color to yellow. Think carefully about where to put this code so that the shapes are stacked in the right order.
In general, about half the points in each lab will be for correct functionality and the other half for the style you use in writing the program. This lab is worth 10 points, which are distributed as follows:
|
Value | Feature |
| 2 pts. | Drawing the sign correctly when the program starts |
| 2 pts. | Changing the color of the text correctly |
| 2 pts. | Making the slash and circle disappear and reappear correctly |
| 1 pt. | Meaningful names used in declarations |
| 1 pt. | Informative comments |
| 1 pt. | Good and consistent formatting |
| 1 pt. | Good choice of Java commands |
The last point is worth additional discussion. Often there are several Java commands that can be used to accomplish the same result. It is important to pick the most appropriate commands. For example, in this lab you could make your circle and slash disappear by sending them behind the background, but this would not be the best choice as it is not obvious what your intent is and there is a more direct way of accomplishing the same result.
Congratulations, you have written a Java program! You are encouraged to continue experimenting with it. Before you do, however, you should submit it as a completed assignment. The submission procedure is electronic and will be basically the same every week.
You can submit your work up to 11 p.m. on Monday evening. If you submit it and later discover that your submission was flawed, you can submit again. We will grade the latest submission made before the 11 pm deadline. The computer may not let you submit again unless you change the name of your folder slightly. It does this to prevent another student from accidentally overwriting one of your submissions. Just add something to the folder name (like the word "revised") and the re-submission will work fine.
When you are done with your session, be sure to log out again by selecting "Log Out" from the "Actions" menu as you did earlier. Please log out each time you leave as otherwise anyone who sits down at the computer can get full access to all of your files.
Computer Science
051
Department of Computer Science
Pomona College